 Save
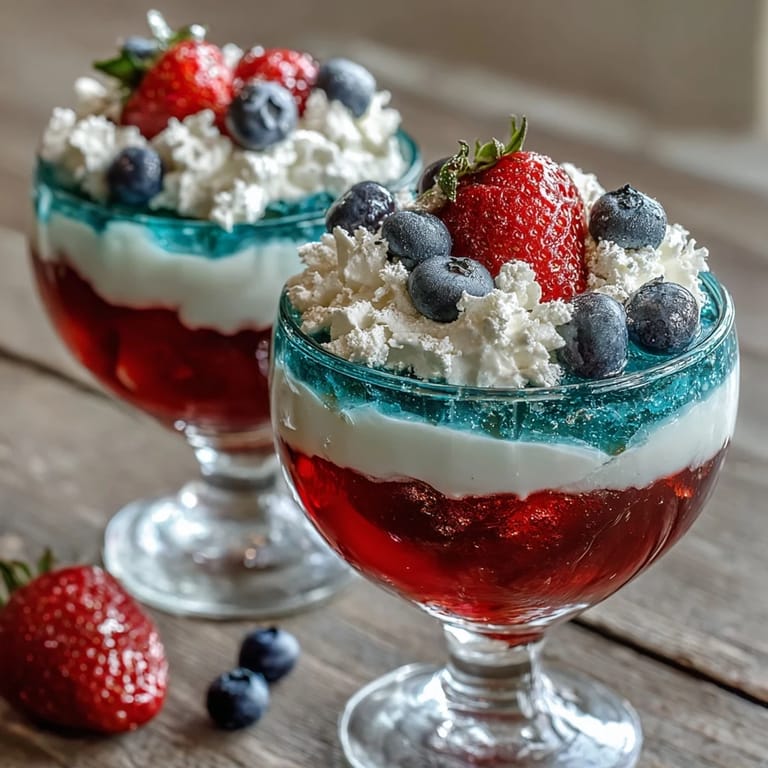
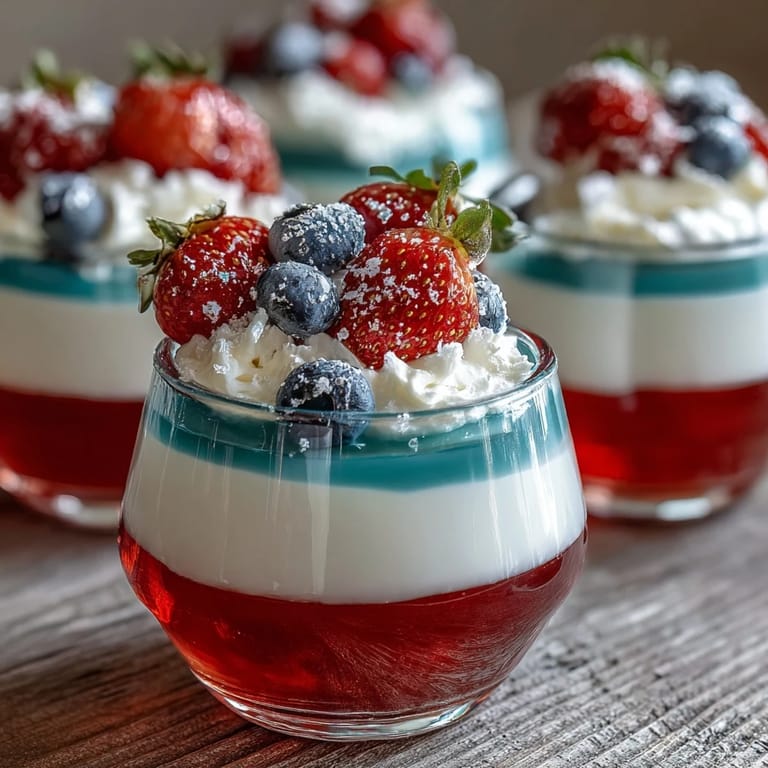
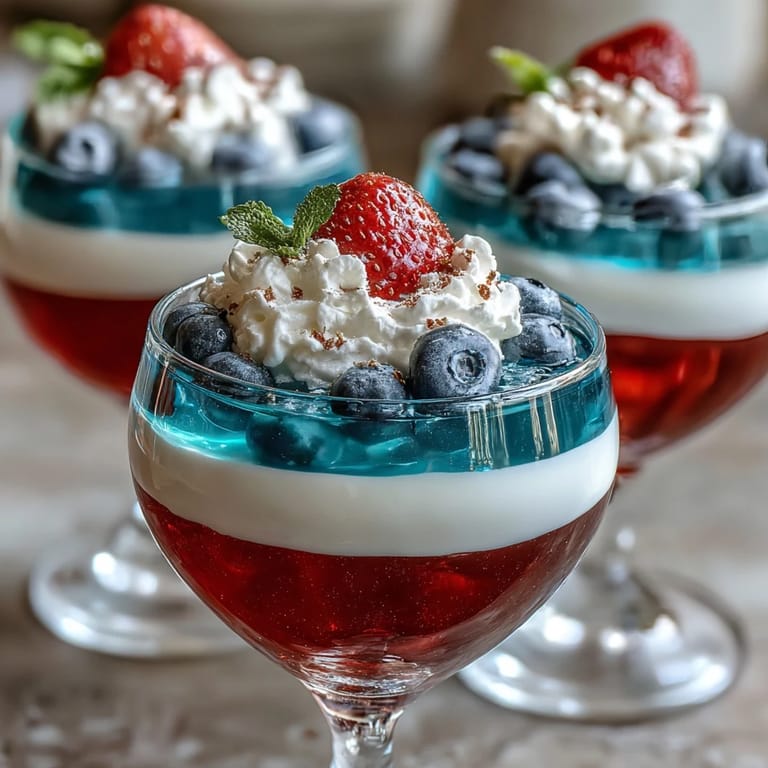
Save One early summer afternoon, my kitchen was filled with the excited chatter of friends prepping for a backyard party, and someone suggested bringing out something truly eye-catching—Red, White, and Blue Layered Jello Cups. With the sunlight streaming in and laughter echoing, the idea of vibrant stripes seemed like just the thing to match the festive mood. The recipe was unfamiliar at the time, but as I layered the colors, the anticipation grew with each step. Somehow, the process felt like painting, just edible and much more forgiving. It was a real joy to see those stripes line up perfectly for the first time.
The first batch I made was for a Fourth of July celebration—I remember nervously posting them in the fridge next to chilled lemonade and watermelon, hoping they'd turn out well for the crowd. Everyone gathered round to see the reveal, and my niece gasped at the striped layers, insisting on being the official taste tester. I think she was won over more by the dazzling look than anything, but the creamy white layer was hands down her favorite. That party ended with sticky fingers and empty cups. It set the tone for future celebrations where these Jello cups became a must-have.
Ingredients
- Strawberry or cherry Jello: The red layer is what starts the parade—for the best color and flavor, use a vibrant brand and always dissolve the powder fully.
- Boiling water: The secret to getting Jello smooth and lump-free is to use rapidly boiling water and whisk thoroughly.
- Cold water: Helps cool the Jello and encourages it to set at the right speed—never skip the cold water step.
- Unflavored gelatin: This gives the white layer its signature creamy texture, and blooming gelatin properly is key to avoid lumps.
- Sweetened condensed milk: Adds sweetness and a rich, opaque stripe—stir gently, and don’t rush; otherwise, it can get grainy.
- Blue raspberry Jello: The electric blue layer tastes subtly fruity and creates the striking finish—make sure to let it cool so it won’t melt previous layers.
- Whipped cream and fresh berries (optional): These turn ordinary cups into party-ready desserts, and the berries add a juicy pop.
Tired of Takeout? 🥡
Get 10 meals you can make faster than delivery arrives. Seriously.
One email. No spam. Unsubscribe anytime.
Instructions
- Prepping your cups:
- Set out 8 clear cups and arrange them within reach—it’s easiest if they’re on a tray or muffin tin for layering and chilling.
- Layering the red:
- Gently dissolve the red Jello in boiling water, then stir in cold water; pour evenly among the cups and tilt each for that diagonal stripe, slipping them into the fridge to set.
- Crafting the white layer:
- Let the unflavored gelatin bloom in cold water before adding boiling water and sweetened condensed milk; give it a good stir, let it cool, then pour atop the set red layer upright.
- Adding the blue:
- Mix blue Jello as before, and once it's room temperature, carefully pour it over the white layer; no need to rush, patience pays off in perfect stripes.
- Finishing touches:
- After the final firm chilling, crown each cup with whipped cream and a handful of berries—now they’re ready for the spotlight.
 Save
Save When I brought out a tray of these cups to a long picnic table dotted with sparklers, they were met with a chorus of oohs, but it was the moment my friend started snapping photos that made me realize—these weren’t just desserts, they’d become the highlight of the celebration. Somehow, the layered colors carried memories of laughter and summer breezes. A simple recipe, made memorable by the company and the smiles it inspired.
The Magic of Layering
The layered technique is easy but requires patience; every time, it feels like a small science experiment as you watch the stripes take shape in clear cups. For me, it’s an exercise in mindfulness—each pause for chilling turns into a quick chat, a coffee break, or a moment to peek at the party setup. The diagonal tilt is my favorite trick; a muffin tin makes it effortless and adds a twist that always impresses guests. There’s something satisfying about pulling out perfectly striped cups after hours of anticipation. Even little hands can help, making this recipe as much an activity as a treat.
Choosing Your Colors and Flavors
I’ve experimented with different flavors for the layers, and while classic berry Jello works best for a patriotic theme, it’s fun to mix it up—lemon for yellow, grape for purple, or kiwi for green. Swapping out colors lets you tailor these cups for any event, not just summer holidays. For flavor, use the brightest-tasting Jello brands; generic ones can be dull. Adding fruit to the layers is tempting, but go easy to avoid muddying the stripes. Kids especially love picking their favorite color—sometimes, blue wins the day by a landslide.
Making It Allergy-Friendly and Dairy-Free
For guests with dairy allergies, substituting coconut milk and sugar for sweetened condensed milk makes the white layer just as creamy and festive. Gluten-free is simple, but double-check ingredient labels—odd additives sometimes sneak into Jello brands. Don’t forget that gelatin is animal-derived, so find a vegan version if needed for more inclusivity.
- I always keep a spare batch with non-dairy milk for anyone who needs it.
- If your fridge is packed, chilling layers flat still works for sharp stripes.
- To avoid disasters, never rush; each layer is worth the wait.
 Save
Save Share these festive cups at your next summer gathering, and watch everyone reach for seconds. It’s the stripes and the smiles that make them unforgettable.
Recipe FAQs
- → How do I achieve sharp layers?
Allow each Jello layer to set completely before pouring the next. Chill cups at an angle for added flair.
- → Can I use different flavors?
Yes, swap berry Jello flavors and select alternatives to fit your preference or event theme.
- → Is there a dairy-free option?
Replace sweetened condensed milk with coconut milk and sugar for a dairy-free, creamy white layer.
- → What tools are needed?
You'll need bowls, measuring cups, a whisk or spoon, clear cups, and a muffin tin for angled chilling.
- → Is this gluten-free?
Yes, but always verify your Jello brand and condensed milk to avoid hidden gluten sources.
- → Can these be made ahead?
Absolutely! Layer and chill the cups in advance; garnish just before serving for freshest results.